

|
|
|
|
|
|
First you need to click the area that you want to customise and then you can select the column you require from the Customize list.
Important: You must click the Drill Down header before you can customise the Drill Down area.
The Customize box appears.
The Drill Down area now displays the employee’s name.
Currently the Drill Down area displays information for one employee only. You will change the view to display all employees.
Important: You must click the Drill Down header before you click View to make the Load All Employees option available.
A Preparing data box appears and then the Drill Down area changes to display all employees.
If you place your cursor on an area border or a column border, it will change to a double-headed resize arrow ![]() . You can then drag the border to change the width of the area or column. Alternatively, you can double-click a column border and the column will change to its optimum display width. First you will increase the width of the date columns.
. You can then drag the border to change the width of the area or column. Alternatively, you can double-click a column border and the column will change to its optimum display width. First you will increase the width of the date columns.
You cursor changes to a double-headed arrow.
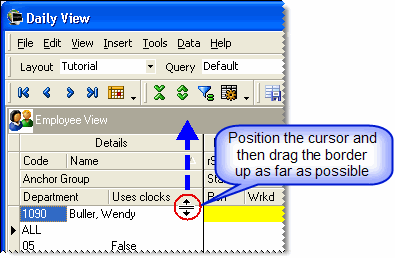
Your cursor changes into a double-headed resize arrow ![]() .
.
You have increased the width of all date columns in Employee View.
Now you will use this method to change the layout of Employee View.
Note: Position your cursor between the grey and the white areas at the top of the Employee View Details area.
Your Daily View window now has the following layout:
Next you will generate a grid report based on this layout.
|
|
|
|
|
Topic: 3463
